Sunday, April 19, 2015

Arduino over Wifi via ESP8266 module

Arduino is pretty handy for low powered projects and is cost-effective (against Raspberry Pi). Not being able to connect to a network natively is a big challenge in applying Arduino for most use cases. While, Arduino has a Ethernet Shield for quite a while, it is impractical to expect a Ethernet port at every point an Arduino would be required. I do have Ethernet-over-Power (EoP) at home to extend its reach, but still didn't scale for me (the over all cost will also include a EoP adapter).

ESP8266 is an effective way to connect Arduino to a Wifi network. It is not a Arduino specific shield. It is a general purpose module that could be mixed with any other micro controller unit/circuit. All you need is a UART communication support on the other end (which almost all micro controllers have built-in). The added advantage is the cost, form-factor (unlike other shields) and just uses 2 pins from the Arduino (RX/TX of UART). The ESP8266 module is pretty small, but does its job well.
ESP8266 Wifi Module

Once powered appropriately, you could communicate with the ESP8266 module via serial communication (@9600 baudrate, at least my version of ESP8266). The Wifi configuration/data everything is then communicated via the extensions to a standard AT command set. This being UART based, its going to be imposing restrictions on the rate of transfer of data (but might not matter for most use-cases) -- just to highlight the difference against a USB or SoC based Wifi implementation.
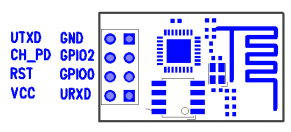
ESP8266 PinOut

The module does have a built-in TCP/IP stack, so we don't have to worry about that -- that's why we do get response to ping automatically (as shown in the video below). It is not full-fledged though; provides basic connectivity over Layer4 -- good enough. It does have its own DHCP client as well.
There is a open-source library for ESP8266 for Arduino:


This is what I used, except for few fixes that I had to do. Some of the AT commands were differently used in the library. 

Refer to ESP8266_WiFi_Module_Quick_Start_Guide for more up-to-date AT commands.

Here is the video showing my project in action :) Arduino joins my home Wifi network; shows its own IP on the LCD; runs a TCP server at port 1555 and waits to accept new connections. I connect from my desktop Ubuntu and send a message which shows up correctly on the Arduino LCD.


This is going to be a cool extension to my geyser control project now -- I should be able to control my geyser from anywhere and more importantly time it based on the needs. Some sort of security needs to be worked out.

Sunday, February 08, 2015

How I troubleshooted a tripping MCB

A tripping MCB is nothing uncommon and I have troubleshooted the faulting device many times before, but this time was interesting and challenging; hence the post.

We had this nagging issue of our master MCB tripping every time we turn on the ceiling fan in one of our bedrooms. To complicate the problem further, the fan is a designer fan and has 3 light bulbs and a built-in speed control (via hanging strings). So the faulting electrical component could be one of the bulbs, OR the speed-regulator inside the fan, OR one of the fan's electrical components (capacitor, coil etc.,), OR the speed-regulator on the switch board OR something that I didn't think of then.

The regulator on the switch board was the least of my suspects, as my first suspect was the bulbs (hunch!) or something in the fan. Removed the bulbs and tried, no use. Opened the fan's casing and looked for any obvious burns or something -- no sign of any electrical fault. This doesn't rule out a problem with the fan, but I wanted to cover all easy approaches before getting into disassembling a fan.

Just decided to checkout the switchboard. As I opened the switchboard, it was evident! As you see below, I could see a burnt regulator casing with some internal leakages.


It appeared like, this was the issue. Since our fan has a builtin regulator and I didn't have a spare one handy, I decided to short the regulator off the circuit and use the fan's strings to control the speed. Changed the wirings quickly and tried, and Viola! the fan is running normally without tripping the MCB. Even the fan's built-in regulator worked.

(Pic: had just taken the regulator off the circuit) 

With sense of satisfaction, I switched off the fan and closed the switchboard completely and screwed it tight. All done, so wanted to try for one last time that all is well. I turn on the fan, and the MCB trips! Wow, that's something :)

I had to stop for a while, as I couldn't come up with a theory for this. As you might know, the typical household switches control only one polarity (typically phase/line), the neutral goes to the appliance (fan) directly. The possibility of a short-circuit inside a switch board is pretty less (except if the switch board has a high amperage plug or something, that controls both polarities). And in this case, the MCB trips only when I turn on the fan. So it should be something related to the switch, but the switch has only one polarity! I was pretty sure, I'm missing something, because I couldn't explain the behavior.

The hint I got was the fact that, it all worked until I closed the switchboard. I just realized that our MCB also has Earth Leakage Protection. So it's probably not a short, but earth-leakage. On a closer look at the wiring that goes off the switch, towards the fan, I could find this:


In one of the joints, the insulation had burnt a bit, exposing few strands of the wire. When I closed the board tight, these strands came in contact with the metal casing inside the switch board, which is grounded. This triggers a leakage on the earth line and the MCB trips. I just had to redo the insulation with new tape, and that was it. The fan is running fine since then, without tripping the MCB.